Summary
The article shows how to build custom UI widgets using the Webix JavaScript library—specifically combining base Webix components like DataTable, Pager, and Search to make complex, reusable UI elements. It explains the implementation details (building a table with search & paging) and highlights Webix’s advantage in rapid development, flexibility, and maintaining performance even with large data sets.
In developing the user interface for a web app, you must solve two fundamental problems. First, you must build everything fast, and second, the app must remain unique. There are plenty of web development tools that help to solve the first problem. Various frameworks and libraries, such as React, Vue.js, Angular, and Webix, are at your disposal when you need to build apps faster and more efficiently. The more demanding challenge is to make your app stand out from the competition. Here, you must spend a lot of time customizing the standard components libraries provide. For example, building such a familiar web app element as a complex user list that allows dragging items and opening user cards may require much effort. That’s why it’s more practical to create complex widgets as a combination of simple UI elements and reuse them in different parts of the application or even in other projects. For example, this popup contains a text editor, a simple drop-down element, and a drop-down element with a multi-select feature:

The more extensive app you build, the more complex functionality you need, and sometimes an out-of-the-box feature set can cover all your requirements. Nothing restricts you from creating as many widgets as you need. The question is, how to choose a development tool whose customization capabilities will make this task manageable?
Business Benefits of Using Webix in Your Projects
Building any custom web app component goes through the standard procedure of collecting requirements, negotiations, development, and testing, which extends the time between IDEA and its IMPLEMENTATION. In this case, Webix Table helps to save your time and money by using ready-made components that are easy to install and configure, which is a very beneficial feature for every business sphere. Compared to any other popular JavaScript library, where businesses have to customize components from scratch, in Webix Table, users meet a well-known interface with the possibility to embed new features with ease, as shown in the example with Search and Pagination below.
Often, UI libraries that provide access to ready-to-use UI elements have built-in paging in all components that involve working with a large amount of data. A data grid, for example, will most likely include much more data than a few lines can fit, which makes such an approach pretty useful. However, Webix uses a separate UI component for this. Such independence enables some additional advantages in configuration and customization for your needs. For example, you can specify the number of buttons to move to a specific page the app will show. Also, buttons that allow moving to the first or last page and those allowing you to open the next or previous page are under your complete control. You can enable paging anywhere in your web app and adjust the component’s appearance and functionality as you like.
Webix Table is ready to process big arrays of data without lags which can be very useful for such business areas as construction, real estate, logistics, and accounting. In such companies, users must handle large amounts of numerical data, display it in a structured view, easily define information by specific criteria, and sort and filter it. If you deal with data-rich applications where functionality prevails over appearance, you can also rely on Webix Table and its ability to reduce development time. Also, it can help to enlarge your income without wasting time developing a component from scratch.
Read Also Clash of the Libraries. Building a Data Dashboard with React, Vue.js, and Webix
Adding Extra Features to the Webix Table Component
There are many feature-rich Webix components. Here, you can find basic controls (buttons, checkboxes, or icons) and complex full-functional widgets (Kanban boards, Gantt charts, and pivot charts). However, sometimes they can only cover some of the developer’s needs.
In such cases, developers can combine simple components into complex structures for every UI they work on. Alternatively, they can find a way to build their own complex component and use it in all cases when it suits their needs. Creating your component is a preferred option since it simplifies and speeds up the development of a complex UI. In this article, we’ll discuss implementing a complex widget based on the Webix Table that provides such features as search and pagination.
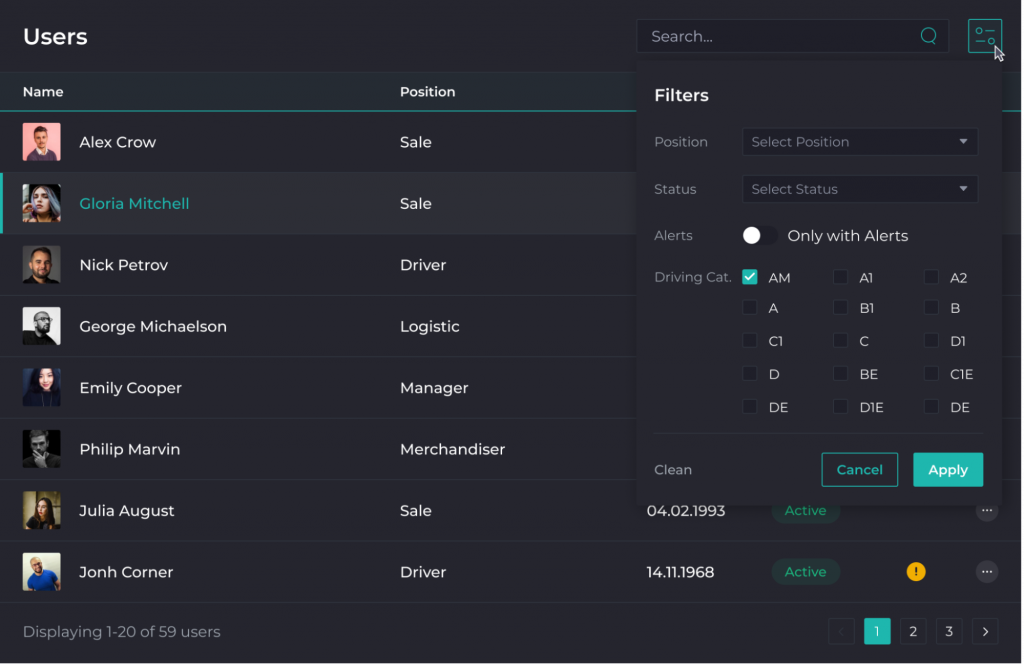
So, our task is to implement a complex component for building tables. We want to combine it with some extra decorators, namely Pager and Search, so we need to ensure they can work with a particular table with no issues. With the Pager component, we can assign unique IDs to make everything work. On the other hand, with the Search component, the situation is more complex. However, the effort will be worth it. Further configuring the widget, adding styles, and displaying a list of users will allow you to get a web app element that looks like this:

First, we need to create the Pager component. It efficiently works with the Webix tables, so we only need to set a unique ID for using this component multiple times on the same page. Let’s set the Pager ID based on the table ID. For this purpose, we will use the getIdByRelatedView() method. Its purpose is to add the string ‘Pager’ to the table ID to ensure it remains unique. To learn more about how to work with constructors, check out this documentation page.
|
1 2 3 4 5 6 7 8 9 10 11 12 13 14 15 16 17 18 19 20 21 22 23 |
export default class PagerComponent extends JetView { private pagerSettings; constructor(app, name, pagerSettings) { super(app, name); this.pagerSettings = data; } config() { const pager = { view: 'pager', id: PagerComponent.getIdByRelatedView(this.pagerSettings.relatedViewId), group: 10, size: 5 }; return pager; } static getIdByRelatedView(relatedViewId) { return `${relatedViewId}Pager`; } } |
The next step is to build the Search component. We need to bind it to the Table component to ensure it works correctly. To pass IDs of related views, we’ll use this.data.relatedViewsId. In the applySearch function, we will call the tableSearch() method. The function itself will search values by its own search criteria related to the particular table.
|
1 2 3 4 5 6 7 8 9 10 11 12 13 14 15 16 17 18 19 20 21 22 23 24 25 26 27 28 29 30 31 |
export default class SearchComponent extends JetView { private searchSettings; constructor(app, name, searchSettings) { super(app, name); this.searchSettings = data; } config() { const search = { view: 'search', localId: 'search', placeholder: 'Search', on: { onChange: () => { this.applySearch(); } } }; return search; } private get $$relatedJetViews() { return this.searchSettings.relatedViewsId.map(id => $$(id).$scope); } private applySearch() { const value = this.$$('search').getValue(); this.$$relatedJetViews.forEach(jetView => jetView.tableSearch(value)); } } |
Let’s get down to creating the table component based on the Webix Table. And, of course, we need to pass the Pager ID to the Table configuration. Once again, we will use the getIdByRelatedView() method to generate an ID for the Pager using the Table ID.
Also, in the Table constructor, we will implement the tableSearch function for searching using the fields we will pass from the outside.
|
1 2 3 4 5 6 7 8 9 10 11 12 13 14 15 16 17 18 19 20 21 22 23 24 25 |
export default class TableComponent extends JetView { private tableSettings; constructor(app, name, tableSettings) { super(app, name); this.tableSettings = data; } config() { const table = { view: 'datatable', id: this.tableSettings.id, columns: this.tableSettings.columns }; if (this.tableSettings.pager) table.pager = PagerComponent.getIdByRelatedView(this.tableSettings.id); return table; } public tableSearch(value) { $$(this.tableSettings.id) .filter(tableItem => this.tableSettings.searchFunction(tableItem, value)); } } |
To create the Complex Table component comprising the Table, Pager, and Search, we must combine all the above elements and make them work as a single mechanism. Additionally, we can make Search and Pager configurable. For example, let’s look at how it’ll work with the Pager:
|
1 2 3 4 5 6 7 8 9 10 11 12 13 14 15 16 17 18 19 20 21 22 23 24 25 26 27 28 29 30 31 32 33 34 35 36 37 38 |
export default class ComplexTableComponent extends JetView { private componentSettings; constructor(app, name, componentSettings) { super(app, name); this.componentSettings = data; } config() { let rows = []; const datatable = new TableComponent(this.app, '', { id: this.componentSettings.tableId, columns: this.componentSettings.columns, pager: this.componentSettings.pager, searchFunction: this.componentSettings.searchFunction }); const searchComponent = new SearchComponent( this.app, '', { relatedViewsId: [this.componentSettings.tableId] }); rows.push(searchComponent, datatable); if (this.componentSettings.pager) { const pager = new PagerComponent( this.app, '', {relatedViewId: this.componentSettings.tableId} ); rows.push(pager); } return {rows}; } } |
And finally, we can use this brand new Complex Table component. For this, we need to pass the following settings:
- the Table ID, also we will use it for the Pager;
- the Table columns;
- the Pager parameters (true if we need it, otherwise false);
- the column ID for searching.
|
1 2 3 4 5 6 7 8 9 10 11 12 13 |
new ComplexTableComponent( this.app, '', { tableId: 'tableIdExample', columns: [ {id: 'id', header: 'ID'}, {id: 'userName', header: 'Name'}, ], pager: true, // true - if we need it, otherwise false searchFunction: (tableItem, searchValue) => tableItem.userName.toLowerCase().includes(searchValue.toLowerCase()) } ) |
Moreover, these are not ordinary tables. They can interact with other components and have extra functionalities. Also, we can work with them quickly and conveniently.
Conclusions
We have provided you with an example of building a complex Webix component that you can give any name you want. For instance, we can name it customComplexTable. Following the described approach, you can build any unique complex component for your needs and easily avoid code duplication problems.
Contact us if you’re looking for an experienced team of Webix developers to modernize your software system or build a new one from scratch.